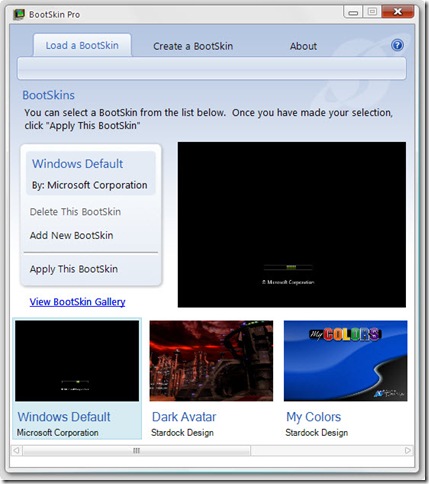
BootSkin Pro was part of the Object Desktop 2009 release. It finally allows users of Windows Vista to create and change the boot screen image with a high-resolution image. Whether you either want to change your boot screen, or create your own to share with others, the process is simple.
BootSkin Pro allows you to both create and change bootskins, while BootSkin allows you only to change the boot screen.
To change the boot screen simply open BootSkin, and scroll through the installed skins. Once you find one you want to use, just click “Apply This BootSkin”. That’s it, pretty simple indeed. You can get more BootSkin downloads at the BootSkin gallery on WinCustomize.com. Click “Add New BootSkin”, browse to the downloaded file, and it will install.

If you ever need to get back to the default skin, just apply the Windows Default BootSkin.
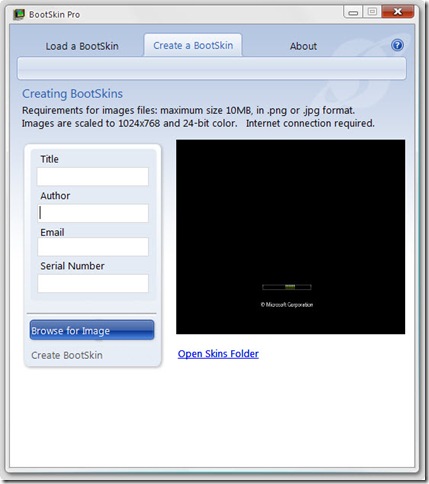
Creating a BootSkin for your own use, or to share with others, is just as simple. Start off by selecting the “Create a BootSkin” tab at the top of the BootSkin window.
The requirements are:
- Maximum files size of 10mb
- .PNG or .JPG format
- Image scaled to 1024x768
- 24-bit color
- Internet connection
When ready, type in the title of the boot skin, enter the other information such as your e-mail, and then browse for the image you want to convert for use. BootSkin Pro will upload the image, convert it into the BootSkin format, and place it into your bootskins folder. You can now apply the bootskin or upload to sites such as WinCustomize.com.

Right now, BootSkin Pro is available to Object Desktop subscribers. A stand-alone download will be available soon. You can get more information at www.stardock.com/products/bootskin/.